您可以将登录机制集成到您的应用程序中,并让您的用户使用他们自己的帐户进行身份验证。
准备工作将添加到您的 Apple 项目中。将以下 Pod 添加到您的:
pod 'FirebaseAuth'
pod 'GoogleSignIn'
如果您尚未将您的应用程序与项目关联,请在控制台中执行此操作。在控制台中启用登录机制: 在控制台中,打开 Auth 部分。在登录方法选项卡上,启用登录方法并单击保存。1. 导入需要的头文件
首先,您必须将 SDK 和 Sign-In SDK 的头文件导入您的应用程序。
迅速
import FirebaseCore
import GoogleSignIn
-C
@import FirebaseCore;
@import GoogleSignIn;
2. 实现登录
请按照以下步骤登录。有关如何在 iOS 设备上使用登录服务的更多信息,请参阅登录开发者文档。
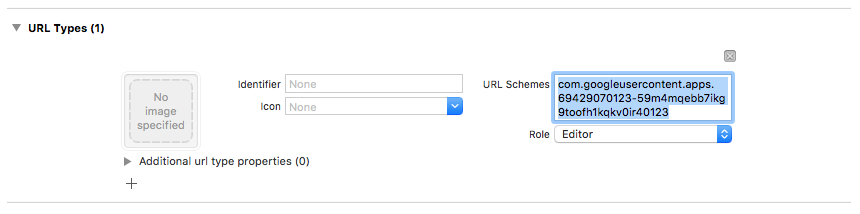
将自定义 URL 方案添加到您的 Xcode 项目: 打开项目配置:双击左侧树视图中的项目名称。在 部分中选择您的应用程序,然后选择 Info 选项卡,然后展开 URL Types 部分。单击 + 按钮并为您的反向客户端 ID 添加 URL 方案。您可以打开 -Info.plist 配置文件并查找键以查看此值。复制此键的值并将其粘贴到配置页面上的 URL 方案框中。将其他字段留空。
完成上述操作后,您的配置应该如下所示(但其中的值应替换为您的应用程序的值):

在应用委托的 :: 方法中,配置对象。
迅速
// Use Firebase library to configure APIs
FirebaseApp.configure()
-C
// Use Firebase library to configure APIs
[FIRApp configure];
在你的应用委托中实现 ::: 方法。此方法应调用实例的方法,该方法将适当地处理您的应用在身份验证过程结束时收到的 URL。
迅速
@available(iOS 9.0, *)
func application(_ application: UIApplication, open url: URL,
                 options: [UIApplication.OpenURLOptionsKey: Any])
  -> Bool {
  return GIDSignIn.sharedInstance.handle(url)
}
-C
- (BOOL)application:(nonnull UIApplication *)application
            openURL:(nonnull NSURL *)url
            options:(nonnull NSDictionary *)options {
  return [[GIDSignIn sharedInstance] handleURL:url];
}
将应用的展示视图控制器和客户端 ID 传递给 Login 登录方法,并根据生成的身份验证令牌创建身份验证凭据:
迅速
guard let clientID = FirebaseApp.app()?.options.clientID else { return }
// Create Google Sign In configuration object.
let config = GIDConfiguration(clientID: clientID)
// Start the sign in flow!
GIDSignIn.sharedInstance.signIn(with: config, presenting: self) { [unowned self] user, error in
  if let error = error {
    // ...
    return
  }
  guard
    let authentication = user?.authentication,
    let idToken = authentication.idToken
  else {
    return
  }
  let credential = GoogleAuthProvider.credential(withIDToken: idToken,
                                                 accessToken: authentication.accessToken)
  // ...
}
-C
GIDConfiguration *config = [[GIDConfiguration alloc] initWithClientID:[FIRApp defaultApp].options.clientID];
__weak __auto_type weakSelf = self;
[GIDSignIn.sharedInstance signInWithConfiguration:config presentingViewController:self callback:^(GIDGoogleUser * _Nullable user, NSError * _Nullable error) {
  __auto_type strongSelf = weakSelf;
  if (strongSelf == nil) { return; }
  if (error == nil) {
    GIDAuthentication *authentication = user.authentication;
    FIRAuthCredential *credential =
    [FIRGoogleAuthProvider credentialWithIDToken:authentication.idToken
                                     accessToken:authentication.accessToken];
    // ...
  } else {
    // ...
  }
}];
添加到您的或 XIB 文件中,或以编程方式对其进行实例化。要将按钮添加到您的文件或 XIB 文件谷歌账号登录验证身份谷歌账号登录验证身份,请添加一个视图并将其自定义类设置为 . 添加视图时,登录按钮不会出现在界面构建器中。在运行应用程序之前,您看不到登录按钮。可选:如果您需要自定义按钮,请执行以下操作:
Swift 将登录按钮声明为视图控制器中的一个属性。
@IBOutlet weak var signInButton: GIDSignInButton!
将按钮与您刚刚声明的属性相关联。通过设置对象的属性来自定义按钮。-C 在视图控制器的头文件中,将登录按钮声明为属性。
@property(weak, nonatomic) IBOutlet GIDSignInButton *signInButton;
将按钮与您刚刚声明的属性相关联。通过设置对象的属性来自定义按钮。
3. 进行身份验证
最后,使用在上一步中创建的身份验证凭据完成登录过程。
迅速
Auth.auth().signIn(with: credential) { authResult, error in
    if let error = error {
      let authError = error as NSError
      if isMFAEnabled, authError.code == AuthErrorCode.secondFactorRequired.rawValue {
        // The user is a multi-factor user. Second factor challenge is required.
        let resolver = authError
          .userInfo[AuthErrorUserInfoMultiFactorResolverKey] as! MultiFactorResolver
        var displayNameString = ""
        for tmpFactorInfo in resolver.hints {
          displayNameString += tmpFactorInfo.displayName ?? ""
          displayNameString += " "
        }
        self.showTextInputPrompt(
          withMessage: "Select factor to sign inn(displayNameString)",
          completionBlock: { userPressedOK, displayName in
            var selectedHint: PhoneMultiFactorInfo?
            for tmpFactorInfo in resolver.hints {
              if displayName == tmpFactorInfo.displayName {
                selectedHint = tmpFactorInfo as? PhoneMultiFactorInfo
              }
            }
            PhoneAuthProvider.provider()
              .verifyPhoneNumber(with: selectedHint!, uiDelegate: nil,
                                 multiFactorSession: resolver
                                   .session) { verificationID, error in
                if error != nil {
                  print(
                    "Multi factor start sign in failed. Error: (error.debugDescription)"
                  )
                } else {
                  self.showTextInputPrompt(
                    withMessage: "Verification code for (selectedHint?.displayName ?? "")",
                    completionBlock: { userPressedOK, verificationCode in
                      let credential: PhoneAuthCredential? = PhoneAuthProvider.provider()
                        .credential(withVerificationID: verificationID!,
                                    verificationCode: verificationCode!)
                      let assertion: MultiFactorAssertion? = PhoneMultiFactorGenerator
                        .assertion(with: credential!)
                      resolver.resolveSignIn(with: assertion!) { authResult, error in
                        if error != nil {
                          print(
                            "Multi factor finanlize sign in failed. Error: (error.debugDescription)"
                          )
                        } else {
                          self.navigationController?.popViewController(animated: true)
                        }
                      }
                    }
                  )
                }
              }
          }
        )
      } else {
        self.showMessagePrompt(error.localizedDescription)
        return
      }
      // ...
      return
    }
    // User is signed in
    // ...
}
-C
[[FIRAuth auth] signInWithCredential:credential
                          completion:^(FIRAuthDataResult * _Nullable authResult,
                                       NSError * _Nullable error) {
    if (isMFAEnabled && error && error.code == FIRAuthErrorCodeSecondFactorRequired) {
      FIRMultiFactorResolver *resolver = error.userInfo[FIRAuthErrorUserInfoMultiFactorResolverKey];
      NSMutableString *displayNameString = [NSMutableString string];
      for (FIRMultiFactorInfo *tmpFactorInfo in resolver.hints) {
        [displayNameString appendString:tmpFactorInfo.displayName];
        [displayNameString appendString:@" "];
      }
      [self showTextInputPromptWithMessage:[NSString stringWithFormat:@"Select factor to sign inn%@", displayNameString]
                           completionBlock:^(BOOL userPressedOK, NSString *_Nullable displayName) {
       FIRPhoneMultiFactorInfo* selectedHint;
       for (FIRMultiFactorInfo *tmpFactorInfo in resolver.hints) {
         if ([displayName isEqualToString:tmpFactorInfo.displayName]) {
           selectedHint = (FIRPhoneMultiFactorInfo *)tmpFactorInfo;
         }
       }
       [FIRPhoneAuthProvider.provider
        verifyPhoneNumberWithMultiFactorInfo:selectedHint
        UIDelegate:nil
        multiFactorSession:resolver.session
        completion:^(NSString * _Nullable verificationID, NSError * _Nullable error) {
          if (error) {
            [self showMessagePrompt:error.localizedDescription];
          } else {
            [self showTextInputPromptWithMessage:[NSString stringWithFormat:@"Verification code for %@", selectedHint.displayName]
                                 completionBlock:^(BOOL userPressedOK, NSString *_Nullable verificationCode) {
             FIRPhoneAuthCredential *credential =
                 [[FIRPhoneAuthProvider provider] credentialWithVerificationID:verificationID
                                                              verificationCode:verificationCode];
             FIRMultiFactorAssertion *assertion = [FIRPhoneMultiFactorGenerator assertionWithCredential:credential];
             [resolver resolveSignInWithAssertion:assertion completion:^(FIRAuthDataResult * _Nullable authResult, NSError * _Nullable error) {
               if (error) {
                 [self showMessagePrompt:error.localizedDescription];
               } else {
                 NSLog(@"Multi factor finanlize sign in succeeded.");
               }
             }];
           }];
          }
        }];
     }];
    }
  else if (error) {
    // ...
    return;
  }
  // User successfully signed in. Get user data from the FIRUser object
  if (authResult == nil) { return; }
  FIRUser *user = authResult.user;
  // ...
}];
下一步
用户首次登录后,会创建一个新用户帐户并将其与用户用于登录的凭据(即用户名和密码、电话号码或身份验证提供商信息)相关联。这个新帐户存储在您的项目中,并且可以被您项目中的每个应用程序用来识别用户,无论用户如何登录。
您可以通过将多个身份验证提供程序凭据与现有用户帐户相关联,使用户能够使用多个身份验证提供程序登录您的应用程序。
要注销用户,请致电。
迅速
    let firebaseAuth = Auth.auth()
do {
  try firebaseAuth.signOut()
} catch let signOutError as NSError {
  print("Error signing out: %@", signOutError)
}
-C
    NSError *signOutError;
BOOL status = [[FIRAuth auth] signOut:&signOutError];
if (!status) {
  NSLog(@"Error signing out: %@", signOutError);
  return;
}
您可能还需要为所有身份验证错误添加错误处理代码。请参阅处理错误。
谷歌锁区号/谷歌邮箱老号-购买商城
谷歌play地区代改
Google Voice号码支持自助购买
谷歌锁区号购买商城]
如果您还有其他问题可以加我电报交流。
电报号:telegram:@tianmeiapp
需要解决问题的人很多,为了更好的处理网友的问题
>拒绝白嫖
>劝君莫做伸手党
>不要下次一定
原文链接:AppleSwift-C2.导入所需的头文件导入方法介绍,转载请注明来源!